General Background in Stained Glass Windows.
All stained glass windows are comprised of three elements: pieces of glass; lead came which holds the pieces of glass together; and the support system, which holds the entire design upright in the window frame.
I. Glass
A. Types
1. Antique – hand-blown
2. Cathedral glass – machine rolled, is less expensive than antique glass, and has a very even texture; its colors are not as rich. Windows are translucent (light passes through).
3. Opalescent – Usually a two to three color mix in a milky white glass being fused during the manufacture. Opalescent glass is the basis for the range of glasses created by Tiffani and LaFarge.
To expand the range of color, texture or density. Tiffany and LaFarge developed a process called plating. The plate is a second layer of glass added to a selected area within the window to create a new color or to increase depth.
B. Preparation – Steps
1. Design is made and then glass cut
Glass is cut and shaped into component pieces on a design called a cartoon. It is laid out on a light table or viewing easel to see the effect of light passing through.
2. Staining– used for border and background.
Melting different metallic compounds into the glass used to stain the surface of the glass for the desired color and effect. Silver oxide – yellow or gold amber; Cobalt – blue; Gold – red color.
3. Painting is commonly used for details such as hands, feet, folds of drapery, or faces. The paint is made mostly from bits of ground colored glass and is fired onto the surface of a glass panel using a kiln.
Glass is fired in a kiln to bond the paint to the surface of the glass.
II. Lead Came and assembly.
A. Layout.
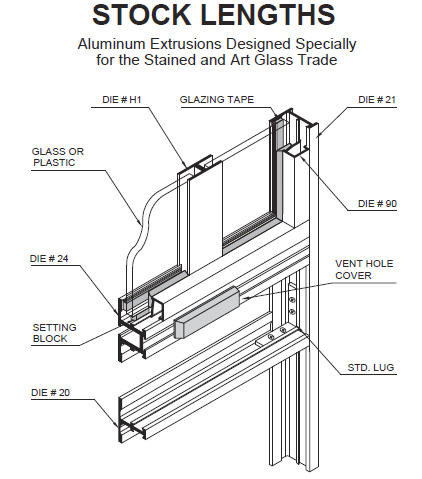
Lead came is available in 5-6 foot pieces and on dispensing rolls for smaller gauge lead. Lead came is commonly cut with lead dikes or glazing knife. Each piece of glass is set in place upon a glazing drawing, with the came shaped around it to make a matrix. To improve strength, modern came is actually an alloy that contains antimony, silver, copper, or tin.
B. Soldering the joints.
The lead came is soldered at the joints between strips with lead/tin solder
C. Glazing.
Every stained glass panel needs to be glazed- the final and most important step in completing a lead panel. Glazing protects stained glass for years to come by strengthening and waterproofing indoor and outdoor stained glass panels. Correctly glazed panels have the added benefit of uniformly colored leading and displaying the glass art in its best light. Glazing is the process of working cement or putty between the glass and the lead came, a necessary step even if the panel is for indoor use. Lastly, the ears are pressed down against the glass, securing the piece and further waterproofing the panel. Whiting is reapplied to window sparingly for cleaning and removing excess oils left from cementing.
D. Windows sections.
A Window is divided into several independent sections. The dividers are called mullion to create smaller sections. These mullions usually add a decorative pattern to the window framing in addition to ensuring stability for the leaded glass. Individual leaded glass panel sections should be 12 square feet (1.2 square meters) or less. Any section or opening within the window’s frame that is larger should be further divided with horizontal T-bars called muntins).
III. Support
A. Bars
The window’s support system consists of bars running across the window, tie wires to secure the window to the bars, and the window frame. They are put into the sash of the window frame at 1.5 to 2-foot intervals. These are on the inside of the stained glass and would be attached to the leaded panel using copper wires that are soldered to the lead came and wrapped around
the steel reinforcing bar.
B. Wood frame.
Sealants (e.g., putties, caulks, and silicones) are used to seal the leaded panel against the sash, and to seal any open joints around the window frame.
C. Covering.
Coverings have been used to protect again vandalism and to protect against the weather, especially wind-driven rain. If an exterior protective covering is installed, it must be properly vented to allow the moisture that collects in the space between the stained glass window and protective covering, to dry out between condensation cycles.
1. Laminated – A clear plastic sheet laminated between two sheets of glasses (ex. car windshield). It holds together when broken.
2. Tempered glass – Similar to laminated but stronger and resistant in the first place and also more expensive.
3. Lexan –St. George’s installed these in the late 1990s except on the Tiffany windows. Shatterproof but tends to yellow when exposed to the sun when 10-20 years old and susceptible to hazing from windblown particles. It tends to flex in expansion periods creating an unattractive glare.
IV. Window Problems.
Generally, windows last 80-100 years without major maintenance
A. Covering
Inadequate ventilation with coverings particularly Lexan can promote condensation; causes heat to build up in the air space and thereby increase the window’s expansion/contraction and loosen the glazing cement; eliminate natural ventilation; reduce access for maintenance. Lead cames are discolored (oxidized) and become brittle.
Tiffany Studios, for example, often used plate glass to keep dirt and moisture out of their multi-plated windows
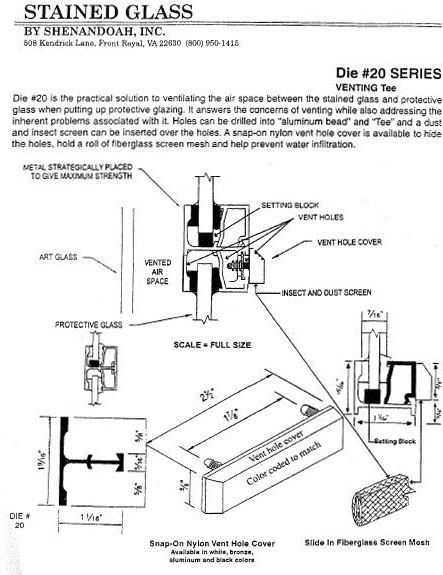
One solution is a newly designed protective covering. Here is an example from Stained Glass by Shenandoah
B. Windows bulging
Due to years of exposure, gravity, heat build up, settling and improper bracing, bulging occurs in most stained glass]
V. Solutions
1. Re-leading
Reassembling the window with new lead came. The window is taken apart and reassembled. The glass pieces must be removed from the cames, the old cement must be cleaned from each piece of glass, and all the pieces must be rejoined precisely. It is essential to request a copy of all window rubbings if the windows are to be completely re-leaded.)
2. Flattening
The affected panel needs to be removed from the frame and carefully placed flat on the table over a few weeks. Moderate weight and controlled heat will help coax the window back into its original plane.
Once the panel is flat, broken joints will need to be soldered. The original bracing may need to be re-secured as well as additional bracing to support the weakened area.
3. Braces
Braces are mostly flat, rectangular or round and are subject to corrosion. Occasionally, leaded glass was designed or fabricated with inadequate bracing; this results in bulging or bowing panels. Wires often broken from braces
4. Wood issue –
Left unprotected, wood and glazing compounds decay over time from moisture and exposure to sunlight-with or without protective storm glazing-allowing glass to fall out.
Solution
a. Sealer and epoxy
b. Paint
c. Replacement of the wood in parts or in entirety
5. Re-cementing
Years of exposure to elements and heat will dry and reduce the cement compound in a stained glass window. Re-cementing will strengthen and weatherproof the window by replacing the original cement compound, which has loosened or fallen out over the years.
You should ask whether applied to the exterior surface of windows (typical) or interior (less typical since can be messy)
6. Cleaning
Dirt, soot, and grime can build up on both sides of the glass from pollution, smoke, and oxidation. In churches, the traditional burning of incense or candles can eventually deposit carbon layers. These deposits can substantially reduce the transmitted light and make an originally bright window muted and lifeless. Simply cleaning glass will remove harmful deposits, and restore much of its original beauty, while providing the opportunity to inspect its condition closely.
7. Broken or cracked stained glass
Glass, although virtually impervious to erosion, is susceptible to cracking, breakage, scratching, and etching (as by abrasion or chemicals). Today there are three primary options for repairing broken glass: copper foil, epoxy edge-gluing, and silicone edge-gluing.
Copper Foiling: generally the best option when a piece of glass has only one or two cracks. Copper foil is a thin tape that is applied along each side of the break, trimmed to a minimum width on the faces, and soldered. A copper wire can be soldered on where additional strength is required.
Epoxy Edge-Gluing: This technique produces a nearly invisible line and is often used on painted glass, particularly focal points of a window such as a face, or a portion of the sky intended to be one continuous piece. Epoxy can even be tinted to match the glass. It is also used for infusing shattered glass or microscopic cracks caused by intense heat from a fire.
Epoxy produces a very strong repair, but will deteriorate in sunlight and requires secondary glazing to protect it from UV degradation. Epoxy is the least reversible of the three techniques, and usually the most expensive.
Silicone Edge-Gluing: This repair method has the lowest strength and should be used when a flexible joint is desirable-if, for instance, the window will be under continuous stress. Silicone repairs are easily reversible, and can be removed with a razor blade-when they are done correctly, that Silicone is not affected by temperature, humidity or UV light. Silicone repairs are typically the least expensive repair option.
8. Painted glass is flaking or fading.
Painted glass is susceptible to another type of damage: flaking.
If fired improperly, or if poor quality mixtures were used, painted glass is especially vulnerable to weathering and condensation. As the paint flakes off in tiny particles, the window panel will often appear to be fading. Flaking can occur because poor quality paint mixtures were used, or because the glass was fired improperly. A conservator must determine the stability of painted glass before cleaning or repainting can take place.